Wednesday, November 8, 2017

TMC - Prelude OP: Golem


"Well, well... if this isn't Jonathan "The Lizard" Cassidy!" The disgust was clearly recognizable in the womans voice. Moments ago, she had entered the asigned waiting area of the DEC-Shop and had approached the wallmounted plastic seats with long, striding steps. One of them was occupied by a man, who was wearing a long leather coat, with had looked probably pretty handsome, years ago. He looked up with little interest, a cold cigarello changing from one corner of his mouth to the other.
The woman shook pitying her head. "Yack, if the hire scum like you, they are either pretty desperate or it is going to get really dirty." "Aaand a good day to you too, Jen!"


The air didn't get stale, it was so thick, you could cut it to pieces. And the cigar, someone was smoking, wasn't helping to make it better. A felt eternity ago, the air conditioner had came with a screeching sound to a halt and had taken the last breeze of breathable air with it.
More than a dozen persons, that were cramped into the tiny container, were staring motionless onto the little transportbox in their mid. On top of the box, next to a couple of papers, was a white, ovalshaped object lying. A small diode on its side was constantly emitting a lazy flashing red light.
Suddenly, the lights color turned from red to green, the flashing grew quicker, until it turned into a constant light impuls. The object started to hum softly and the Holo-Projector jumped to life...

 
At first there was only a yellow, octagonal Logo, rotating in mid air. Then, in the middle of the octagon, a face appeared, that was plainly a computer generated face. Without any movement of the lips, a voice was to be heard...


"Ladies and gentlemen, I am really sorry for the inconvenience of this place." Somewhere in the shadows, someone shallowly coughed in agreement. "But the order situation presses for the highest degree of discretion and who would assume such an illustrious group as yours to be in such a place? Well, I figure you all had time to get to know each other. As you can see, this assignment won't be carried out exclusively by our personel. This assignment, I will illustrate in a minute, is asking for the higher expenses.
But before we carry on, I would like you to check your bank accounts and verify the contract I have send you via your ComLog. Since you have stayed put in this place for such a long time, I assume, that all of you are highly interested in this assignment."
The silence came abrupt. Then, hesitatingly at first, ComLogs of all shapes and kinds were activated. After a few moments an appreciating murmur filled the chamber.
´"Apparently you like what you see. Well then, let's talk about the buisness.


The Company XIn TI is working secretly on an improvement of the LHost Technology. It is not confirmed, but most likely, that ALEPHs research section is involved in this enterprise.
As we havel learned from trustworth sources, the research has reached a point, where the company was able to build a couple of prototypes and they are said to be only steps a way from mass production. Our employer has already put quite some efford and resources into gaining these data and has already tried to obtain the plans of these LHosts himself, with little success.
 
In the end, we could win a employee of Xin Ti for our cause and know now where these LHosts are produced. Since ALPEH can't have a O12 sanction for this enterprise, we assume that only a really small range of individuals outside Xin Ti know about this. We are not sure, how much, if anything at all, of the Yu Jing government knows about this.
 
This is an advantage for us, since we can predict the military resilience of the laboraties, which can't be very high, compared to what it would be, if Yu Jing would be involved to full extent.
 
Your mission, ladies and gentlemen, is to infiltrate the facitlity and brng back as much LHosts as you can. There will be a bonus payment for every secured LHost. Other squads, similiar to yours, are already in place and working on fullfilling previous steps of this plan."


With this, that face dissapeared and was replaced by a holographic projection of something, that looked like a christmastree upside down. The projection was pale blue and rotated in midair. Two red, blinking octagons appeared on the map and seemed to move slowly, on at the trees trunk and on somewhere further down.
"As you can see, we have already two teams on-site. Team Mots task is to let you in into the complex, without much trouble. Team Hai has switched places with a couple of employees and has infiltrated the security network days ago. Should any alarm ring, they will make sure nothing leaves the complex.
Team Ba, Team Bon and your team, Team Nam all have the same task: get to the designated positions, get the LHosts and bring them to the elevator in the middle of the complex. Team Mot will assure that you will get back to the surface and reach your pick up.
 
For any questions, please turn to SYRA or check your detailed mission briefings on your ComLog.
 
Good hunt, everybody."
 
With a almost unhearable click the projection turned off. Then there was a zisching sound and a thin trail of smoke came from the projection, indicating that all traces had been wiped away.


With a slight rumble, the freight container was lifted into the air and disappeared next to numberous other containers in the gaping belly of the freighter ship.
 

Tuesday, November 7, 2017

The Makrinos Chronicles - The Protagonists

Let's have a look at the Protagonists.
The opponents of the story so far have been my H-Logs (follow the lik to the painting thread) against the haqqislamic NOD-Biotech.
With the release of Tonie's Eduardo, I had to start a new army, the DEC (again...linky to paint thread), while my favourite opponent switched to Yu Jings Imperial Service.
 
As a sort of prequel, here the fluff for my DEC

"The Dynamic Execution Corps is two things in one:
A mercenary regiment and a agency.
As a mercenary regiment, we can provide our customers with a wide  range of our own units. From all ranges of Infantry up to our very own TAGs, when simple man power is just not enough, we have for almost any need a suiting answer. Due to our vast transportation system and our numerous supply centres, these units are highly flexible in their use.
If our own units are not the answer to your probelm, one of our many contractors surely will. As an agency, we have a wide range of different contractors in our portfolio, that should cover your every need. All your dealings with the contractors will be done by our agents, so that you simply tell us what you need and we will see to it, that it is done. This way, we can achieve the high degree of anonymity, we are so proud of. The contractors themselves profit from our supply and transportation system, so that they are best equipped for your demands.
For more information, please click here."
Excerpt from a information pack
Available on Arachne and Maya
 
"The DEC is rumored to have connections to the nomad nation. For sure is only known, that it has been hired quite a lot by H-Logs. The origins of the company lay officially in a joint venture of different investors. If you look closely, atleast one of the following names appears  every investing conglomerate: Castor and Pollux.
There is a rumour about these two, whispered in the darkest reaches of arachne. A couple of attemps to uncover the truth of these rumours have lead to nothing, but it still occours in wardriver chats and hacker hangouts: Castor and Pollux are said to be the result of a retribution venture of the black hand. The Balck Hands Hackers were tasked to create a virus, that, injected into an Deva Aspect of Aleph, would seperate the fragment from Alephs consciousness and there destabilze Alephs Immunesystem.  Castor and Pollux are rumoured to e a result of a test run of that virus. The served aspect formed an own identity and fled into the Arachne Net. 
But if this is actually true or just a rumour spreaad by who ever will probably never reach the surface. But one thing, I can tell you for sure... something is reaally wrong with these two and you should pay your dept to the DEC, because they will find you and when they do,  "seperation" might be one of the words used..."
Chat in "Tonie's Badabing"
Silas Ark 


The Society of the Jade Door


“When there is no desire, all things are at peace.”
― Lao Tzu, Tao Te Ching
 
 
The Jade Door is a splinter group of YuJings Imperial Service. All Agents of the Service strive to fight crimes and deviations within YuJings Population. The members of the Jade Door however are believers that in a population of billions with free minds massive deviations from the will of the dragon emperor are inevitable on a scale where only the most extreme can possibly be corrected by the service. Most deviations however, cannot be corrected and will undermine the unity and harmony of the state. Therefore, free minds are by definition unable to from a harmonic state without weakening struggle within and must itself be corrected into a mind that follows only a common will of the society as a whole. Towards this goal, the Jade Door focused on developing advanced brainwashing techniques, cube manipulation and even the construction of own Lhosts with modified brain activities, all to create the perfect citizen for the Yu Jing empire.
 
 
Other groups and officials within the YuJing government declined the beliefs of the society and saw its growth with envy and anxiety. When the Jade Door eventually started experimenting with looted Sepsitors, its enemies allied and started a political cabal to bring the society down. It was accused of deviating from the emperors will themselves, neglecting their primal mandate to hunt down criminals and betraying humanity by using alien voodootech. Only the reluctance of the emperor to publicly expose the service as divided and quarreled saved the participating agents from dishonorable discharge and prosecution. The Society itself however was prohibited and its activities ceased.


In the following months, several officials within the governemtn who accused the society disappeared without a trace or died in tragic accidents. Those who remain only dare to whisper an outrageous suspicion: That a part of the Jade Door still exist in the shadows, using confiscated funds, roque personnel and hidden black sites to continue their quest for ultimate power over the human mind.  

The Makrinos System

Before we start, I want to fill you in about the system our story takes part in.


The Makrinos System
This small start system was found in the human edge, widely considdered as unimportant point on the star map. Next to some unmapped planets of little interest, the system has 3 habitable planets, Dagan, Silas Ark and Ereskigal. Further more the suns gravitaion keeps a rather thick asteriod belt around the system.
Though being rather out of focus, the hyperpowers and their little challengers all have their hands in this system.
 
Dagan
Dagan was the second planet to be colonialised. Due to the short distance to the sun, icecaps never appeared, so that almost 85% of the planets surface is covered in water. Geological examinations on Silas Ark give a hint to a cosmological catastrophe, that have on the one hand provided Silas Ark with enormous amounts of minerals and metals and Dagan with all the ingredients you need to get an impossible amount of water.
 
Silas Ark
The planets name originates from its explorator Akely Silas. The surname "Ark" came later and is actually misleading. What is meant with the Ark is the geostational space station that lies like a ring around the planet. If you are staanding on the planets surface you can't see the ring, you just see half a ring, an ark, spaning from one horizont to the other. This space station was build by the mining factories, that raided the planet of its minerals and metals. In a "gold-rush" all these companies fell upon the planets surface, dug into it like maggots into a ripe apple. The Ark was build to speed up the logisitcal processes. The ores, minerals and metals could be easily loaded up to the vast space ships, that hurried with swollen bellies out of the system.
When all the riches had been harvested, the companies pulled back as quickly leaving as they had come. With all the money and aall the wealth gone, Silas Ark was left to its self. Mining is still an important factor on the planet and has become part of almost any cultural, political and social aspect. But with the Mining Companies loosing their impact on everything, other branches of commercialism took root.
 
Ereskigal 
Ereskigal consists of the extreme of light and shadow. Since it is the last in line of the planets, its surface is cast into deep shadows most of the time. There are only short periods of light, when non of the other celestial bodies hide it from the systems sun. Due to this, farming is not a big thing and most of the food has to be imported from the hydro-farms of Dagan. In exchange most of the systems tertiary sector houses on Ereskigal. Banks, Servervaults, Labs and their likes bath the cities in their neon lights and create days without night.


Friday, June 30, 2017

Photobucket f*** Up

Hey everyone!

In chase, there are still people craashing here...

you might have noticed, that all the pictures liked to the photobucket host, have gone.

That is due to Photobucket being a massive "yerk" and the work of ages has gone for good.

I will try to relocate all the Images to another host and repost them, so the posts work again.

If you don't want to wait that long, shoot me a mail @ gorsky83 (at)  googlemail.com so I can provide you quicker witht he images.

Until then!

Sunday, March 13, 2016

Silas Ark Bases

Greetings everybody!


Today I have a shorty for you.


When I left the grim dark skull-encrusted future, I also left the sand-glued-on bases basings. Not that there is anything wrong with them, but I felt the change should be also seen on the ground. In addittion to that, I left 40k for Sedition Wars, which was coming with loads of beautifull pre-done bases. SInce I didn't stop with on set of the game, but several, I had plenty miniatures I didn't actaully need for the game and plenty of left over bases.

So, when I switched to Infinity, I didn't had to worry about cool base design, I already owned loads of them. But even the biggest depots come eventually to an end and so did my SW bases. 
There fore I have started to look for alternatives and one of them I want to show you today.
This shall not be a review, so, no tentacles today, but I hope to give you a little insight on this product.

I am talking about the Warsenal Tunguska Bases
  Since I haven't found any unpainted pictures of the bases, I was really excited to learn on how theres are going to work.

And I was quite surprised to find this:
On the one side, you have the bottom plate, including a neat Idea, I will show you later. The other side is textured.

To give you a better idea on how they are, I have put them next to a standard base from CB, a base from Sedition Wars and a Lazaretto Base from Antenocities Workshop , bases, I have already used. I really like them, but they don't give much of variation.
As you can see, the clue with the Tunguska bases is, they have pretty much half the height of a normal base. So when you glue the two parts together, you get the height of a normal base.

And here we have the only problem I am having with the bases...
Even with sanding, it is close to impossible to get the glue line gone, without using putty. I have applyied super glue gel richly and tried to cover up the gap with that a bit, but it still stands out pretty much.

I decided to accept this minor nack, since you get quite a lot for it. As you can see the details don't stand out that much as they do on the other bases. On the other hand, the texture suggests that more of a space ship feeling anyhow, where flat surfaces are to be expected. Another bonus is, that you get 10 different designs. I was expecting that they had made 5 designs and sold them just twice, but, no sir... 10 individual bases.
And...
The hole in the bottom layer of the base...
...is perfect for the 3mm magnets I am using. Surely there are magnets out there that fit completly. But I am happy with what I have here :)


So, now the real test was on: Would the lasered in lines would disappear under to much paint?
As with my other bases, they got a coat of brown from the can.
And, tadaaa, the lines are still there. If you were going for a clean look, you could add some highlight, pick out the details and would be good to go.

As I have shown elsewhere already, I apply a mix of watered down orange and orange pigments...
soak them in that mix...
apply some liquid mask with a sponge...
add the blue I am using (the three on the left side) and rub away the mask (on the right side)
...and get some bases that only need some details and are good to go.

Put aside with other bases, you hardly see the difference.
All in all I have to say they blend in really well with the others, as you can see here:


See you next time!


Friday, March 4, 2016

How to - Holos and Wallpaper

 Greetings everybody!


And welcome back to another "How to" Article.
This time I want to show you how I do Holosigns and Wallpapers.

For those, not so familiar with the mentioned above, let me explain a little.
The first time I stumbled into Infinity, I instantly fell in love with the terrain you "need" for it. The international Forum has been a great source of inspiration even when I was still dwelling in the grim dark future of the 41st Millennium. And one part of the terrain cought me by surprise: printed out stuff. Since there a still walls standing in Infinity, there is also space for commercial posters of all sort. I adopted these back then for 40k terrain, but when I switched to Infinity, I became aware of the full potential that lies in print out stuff.
Today, I want to show you what I have learned over the years.

But first we have to care about some basics:

Stuff you will need

- Printer. To print out stuff you obviously need a printer. Get comfortable with the different settings your printer has and try to get as much dpi (dots per inch) on your print as possible. The standard printer setting is 300 dpi, but you should easily be able to tweak at least 600dpi from it. The higher the dpi the sharper your print will get. I had to fiddle around a bit with my printer... but now, I am quite satisfied with the results.

- Paper. Of cause you need  something to print on. I use the standard copy and print paper. Surely you can et more fancy stuff, but depending on the looks you want to achieve, paper might get to thick and would look awkward.

- OHP-Sheets. The use for that will be explained later. Here, I shall give you a little insight on the sheets. The technique behind OHP-Sheets is rather simple. One side of the transparent foil sheet is covered with a medium, that will get soft, once hit by the printer ink. As the print dries, the small ink dots will get fixed on spot and create the image.


IMPORTANT
Check if you have a Laserprinter (the better, but way more expensive choice) or a Inkjet (works prefectly also. That's what I use btw) and choose the OHP sheets accordingly.


When you buy your OHP sheets, make sure the medium layer is a s thin as possible. I have tried several different brands and found out, that, the thicker the medium layer, the more blurry the pictures will get. And since you will be printing stuff in the size of a stamp, you don't need blurriness. The stuff I am currently using is from Label Ocean and comes with a rather fair price. Of cause, you can pay more, but that sadly doesn't necessarily mean they are better.


- Varnish Spraycoat. It is important to have a spray on varnish. There are several brand on the market, but I am stuck with my beloved Montana Cans, since they dry compared to other brands rather quick and I am an impatient person. You will need a Gloss and a Matt spray. The benefits of a Gloss Medium is, that they create a really strong and solid layer. What every varnish you use, make sure you test them on something else before you use them on your models or prints. I for example have destroyed the paint job on a huge bunch of imperial guard soldiers, since the varnish had turned bad. And suddenly they looked like they had fallen in the ash bin.


- Gloss Varnish Liquid I have spotted no big different between the brands. Head to your local art store and check out what they have. Of cause Vallejo offers a Gloss Varnish, but that is rather pricey compare to other brands.


- Other Stuff What you will defiantly need is a metal ruler and a sharp blade. What else you need, depends on your project. For some simple wallpapers you will additionally need just some white glue. The Holos need a bit more.


- Stuff to print Of cause you will need images you can print out. There are several collections on the international forum here , my personal collection here or you go hunt on google or deviant art for pictures. You can also go as far as do your own stuff. I preferred to use existing images and work on them until they suite my propose. There are several programs with Photoshop being probably the most famous (and most expensive). I am using Paint.Net a rather basic program, that can get boosted quite easily with plug ins to great effect. Last but not least, the are zillions of different fonts out there, that easily beaf up you posters. I could probably write an whole article about this... so I shall leave this here for now.


So... since you probably by now have stopped reading or have run of to get all things sorted, let's start with something simple...


Wallpapers


First of all we have to have a look at what we want to achieve.


[EDIT: For reasons unknow to me, the are few this black after this point. I have absolutely no idea, why that is and how to change it. I have tried all sorts of things, but it still refuses to appear in the correct color. I am really sorry for  that!]


Here we have a few possible uses assembled. To the left you have some simple posters. Believe me, posters will make your building way more "realistic" since they give the gamers and observers a sense for height and usage of the buildings. Measure careful how large your posters shall be. Most of the time they will be around 2 or 3 cm in hight.
To the right we have another usage. Graffiti often comes with the so called outline. These white lines, that surround the painting aim to give a greater contrast between building and painting. We can use that to our advantage. I simply printed that gasmask deer and cut out an outline. Sometimes there are other colors used in graffities... get creative. Either make a addition white out line or carefully cut along the colored outline. Here it is important to use thin paper. Otherwise the graffiti will stand out to much and won't look like painted on the wall.

So. here some steps to wallpapers.


1. Print out.
Set your printer to max dpi and let the print dry.

2. Varnish
Give your print two coats of varnish. First a glossy (makes it sturdier), second a matt (unless you like the gloss look, then go for another layer of gloss). Make sure the gloss is fully dried before you spray it a second time.

3. Cut
Cut the stuff out. Simple as that...


Now you have your posters. You can go and simply glue them with white glue into place. Done.
If you want the posters to stand out a bit more, here is a thing you can do. It works with anything that has a thickness on its own. I am using foamed pvc, but can also use MDF or sheets of  thick plastic. Really depends on the look you want to achieve.

4. Bring the Prints on the surface
For a better grip, I use some sandpaper to roughen the surface.

Then I use white glue and a brush to make a thin layer of glue on which the prints are placed

After it is cured, I cut out the posters again...


Since I don't care much for the Green of the PVC, I use some paint to make the edges black.


There you go. Now you can glue them into place on your buildings.
But, why the varnishing steps you ask? One could simply print and cut out an glue the pieces into place.
Yes you could. But during the whole process, your print will be vulnerable to water and glue of any sort. A single drop can ruin a print quite easily. And if you want to add some weathering of some sort or paint a graffiti on it, your print will smear.
The varnish cares for a protective layer you can work on... i.e. like this.

And here they are glues into place on my current terrain project.


Holos


Holos are, as this epic piece of Infinity Artwork shows, an essential part of the cyberpunk future feeling that is spread by the game.
Microart Studios pretty early realised that and produced a set of Holoboards for the battlefield. With that they sat a standard on how these Holos look on a tabletop.
They produced two different styles, the see-through and the... not-see-through... as depicted here:

So, when doing Holos, my aim was to replicate the style of these.
Okay, let's dive into it... HOLOS! YAY!

1. Print
Use the OHP sheets of your choice and print out the designs.

2. Varnish
Again, as with the paper prints, put some varnish on. Here it is best to use two layers of Gloss Varnish.

3. Let it dry and cut it apart
What can I say? Oh... maybe that you should leave a little extra space on the sides of your print. It is easier to cut any leftovers away later, that to cut too much in the first place...


No... you don't see double... I printed the same thing twice...


... why? Prints on OHP (unless you have a super duper printer with the perfect printer set up) will always loose some color and brightness. But we want our Holos to be colorful an crisp. So, I came up with the idea to print them twice an put them on top of each other. That increases the vividness of the colors drastically.


4. Gluing the prints

The basic idea is, that you use the liquid varnish (glossy as gloss can get) to "glue" the prints on top of each other. You can simply put some few small dots of varnish on one side and then press them together. Of cause a lot of liquid will squeeze out on the sides, but that's not too bad. You have to watch out for air bubbles and squeeze them out.
You can do that so simple, because you have protected your print with the spray varnish. If you don't do that, you might get something like this:

As you can see, the varnish has reacted with th medium on the OHP sheet, smearing the print all over the place.

5. Plexiglass
As you can see, looking at the MAS Holos, the really work just from one side, since on the thick plexiglass they use,  one side is printed on and the other side is "the front" looking from there the Holo get's it depth. But looking from the "other side" the Holo looks more like a Poster.  

To avoid that, I went to my local at store a got a sheet of 2mm plexiglass. I am going to "glue" it on both sides of the print, so the "holo effect" works from both sides.


Additionally I am going to use some clamps and some thick sheets of MDF to keep everything in place.

Again, some varnish...

...some clamp clamp to keep everything in place...

...all most...

...just peel of the foil...

... and... TADAAH! The Holo is done!
Now I just need some sort of frame to hold it in place. I didn't build one before, since I didn't know how thick the final thing would be. Something like this:

I really like to use leftovers from the sprues, since they most of the time fit already perfectly.

6. Other uses
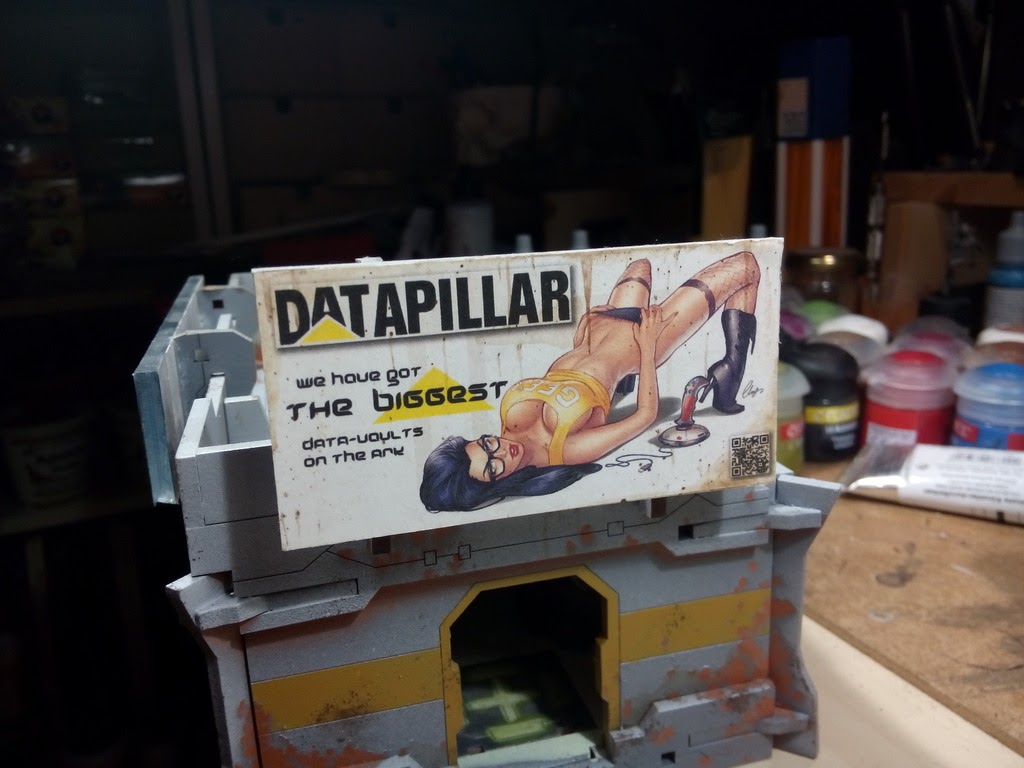
Once you have "mastered" this technique, the possiblillities will open up. On the Datapilar Building, i.e., I have used two prints on each side of a thick Plexiglass sheet. This way another sort of Holoeffect is achieved.


Well. That's basically it. The rest is practice, a steady hand and some imagination. I dearly hope you found all this useful.

Until next time!