
And welcome back to another "How to" Article.
This time I want to show you how I do Holosigns and Wallpapers.
For those, not so familiar with the mentioned above, let me explain a little.
The first time I stumbled into Infinity, I instantly fell in love with the terrain you "need" for it. The international Forum has been a great source of inspiration even when I was still dwelling in the grim dark future of the 41st Millennium. And one part of the terrain cought me by surprise: printed out stuff. Since there a still walls standing in Infinity, there is also space for commercial posters of all sort. I adopted these back then for 40k terrain, but when I switched to Infinity, I became aware of the full potential that lies in print out stuff.
Today, I want to show you what I have learned over the years.
But first we have to care about some basics:
Stuff you will need
- Printer. To print out stuff you obviously need a printer. Get comfortable with the different settings your printer has and try to get as much dpi (dots per inch) on your print as possible. The standard printer setting is 300 dpi, but you should easily be able to tweak at least 600dpi from it. The higher the dpi the sharper your print will get. I had to fiddle around a bit with my printer... but now, I am quite satisfied with the results.- Paper. Of cause you need something to print on. I use the standard copy and print paper. Surely you can et more fancy stuff, but depending on the looks you want to achieve, paper might get to thick and would look awkward.
- OHP-Sheets. The use for that will be explained later. Here, I shall give you a little insight on the sheets. The technique behind OHP-Sheets is rather simple. One side of the transparent foil sheet is covered with a medium, that will get soft, once hit by the printer ink. As the print dries, the small ink dots will get fixed on spot and create the image.
IMPORTANT Check if you have a Laserprinter (the better, but way more expensive choice) or a Inkjet (works prefectly also. That's what I use btw) and choose the OHP sheets accordingly.
When you buy your OHP sheets, make sure the medium layer is a s thin as possible. I have tried several different brands and found out, that, the thicker the medium layer, the more blurry the pictures will get. And since you will be printing stuff in the size of a stamp, you don't need blurriness. The stuff I am currently using is from Label Ocean and comes with a rather fair price. Of cause, you can pay more, but that sadly doesn't necessarily mean they are better.
- Varnish Spraycoat. It is important to have a spray on varnish. There are several brand on the market, but I am stuck with my beloved Montana Cans, since they dry compared to other brands rather quick and I am an impatient person. You will need a Gloss and a Matt spray. The benefits of a Gloss Medium is, that they create a really strong and solid layer. What every varnish you use, make sure you test them on something else before you use them on your models or prints. I for example have destroyed the paint job on a huge bunch of imperial guard soldiers, since the varnish had turned bad. And suddenly they looked like they had fallen in the ash bin.
- Gloss Varnish Liquid I have spotted no big different between the brands. Head to your local art store and check out what they have. Of cause Vallejo offers a Gloss Varnish, but that is rather pricey compare to other brands.
- Other Stuff What you will defiantly need is a metal ruler and a sharp blade. What else you need, depends on your project. For some simple wallpapers you will additionally need just some white glue. The Holos need a bit more.
- Stuff to print Of cause you will need images you can print out. There are several collections on the international forum here , my personal collection here or you go hunt on google or deviant art for pictures. You can also go as far as do your own stuff. I preferred to use existing images and work on them until they suite my propose. There are several programs with Photoshop being probably the most famous (and most expensive). I am using Paint.Net a rather basic program, that can get boosted quite easily with plug ins to great effect. Last but not least, the are zillions of different fonts out there, that easily beaf up you posters. I could probably write an whole article about this... so I shall leave this here for now.
So... since you probably by now have stopped reading or have run of to get all things sorted, let's start with something simple...
Wallpapers
First of all we have to have a look at what we want to achieve.
[EDIT: For reasons unknow to me, the are few this black after this point. I have absolutely no idea, why that is and how to change it. I have tried all sorts of things, but it still refuses to appear in the correct color. I am really sorry for that!]

To the right we have another usage. Graffiti often comes with the so called outline. These white lines, that surround the painting aim to give a greater contrast between building and painting. We can use that to our advantage. I simply printed that gasmask deer and cut out an outline. Sometimes there are other colors used in graffities... get creative. Either make a addition white out line or carefully cut along the colored outline. Here it is important to use thin paper. Otherwise the graffiti will stand out to much and won't look like painted on the wall.
So. here some steps to wallpapers.
1. Print out.
Set your printer to max dpi and let the print dry.

Give your print two coats of varnish. First a glossy (makes it sturdier), second a matt (unless you like the gloss look, then go for another layer of gloss). Make sure the gloss is fully dried before you spray it a second time.

Cut the stuff out. Simple as that...

Now you have your posters. You can go and simply glue them with white glue into place. Done.
If you want the posters to stand out a bit more, here is a thing you can do. It works with anything that has a thickness on its own. I am using foamed pvc, but can also use MDF or sheets of thick plastic. Really depends on the look you want to achieve.
4. Bring the Prints on the surface
For a better grip, I use some sandpaper to roughen the surface.


There you go. Now you can glue them into place on your buildings.
But, why the varnishing steps you ask? One could simply print and cut out an glue the pieces into place.
Yes you could. But during the whole process, your print will be vulnerable to water and glue of any sort. A single drop can ruin a print quite easily. And if you want to add some weathering of some sort or paint a graffiti on it, your print will smear.
The varnish cares for a protective layer you can work on... i.e. like this.


Holos

Holos are, as this epic piece of Infinity Artwork shows, an essential part of the cyberpunk future feeling that is spread by the game.
Microart Studios pretty early realised that and produced a set of Holoboards for the battlefield. With that they sat a standard on how these Holos look on a tabletop.
They produced two different styles, the see-through and the... not-see-through... as depicted here:

Okay, let's dive into it... HOLOS! YAY!
1. Print
Use the OHP sheets of your choice and print out the designs.
2. Varnish
Again, as with the paper prints, put some varnish on. Here it is best to use two layers of Gloss Varnish.

What can I say? Oh... maybe that you should leave a little extra space on the sides of your print. It is easier to cut any leftovers away later, that to cut too much in the first place...


4. Gluing the prints
The basic idea is, that you use the liquid varnish (glossy as gloss can get) to "glue" the prints on top of each other. You can simply put some few small dots of varnish on one side and then press them together. Of cause a lot of liquid will squeeze out on the sides, but that's not too bad. You have to watch out for air bubbles and squeeze them out.
You can do that so simple, because you have protected your print with the spray varnish. If you don't do that, you might get something like this:

5. Plexiglass
As you can see, looking at the MAS Holos, the really work just from one side, since on the thick plexiglass they use, one side is printed on and the other side is "the front" looking from there the Holo get's it depth. But looking from the "other side" the Holo looks more like a Poster.
To avoid that, I went to my local at store a got a sheet of 2mm plexiglass. I am going to "glue" it on both sides of the print, so the "holo effect" works from both sides.


Now I just need some sort of frame to hold it in place. I didn't build one before, since I didn't know how thick the final thing would be. Something like this:

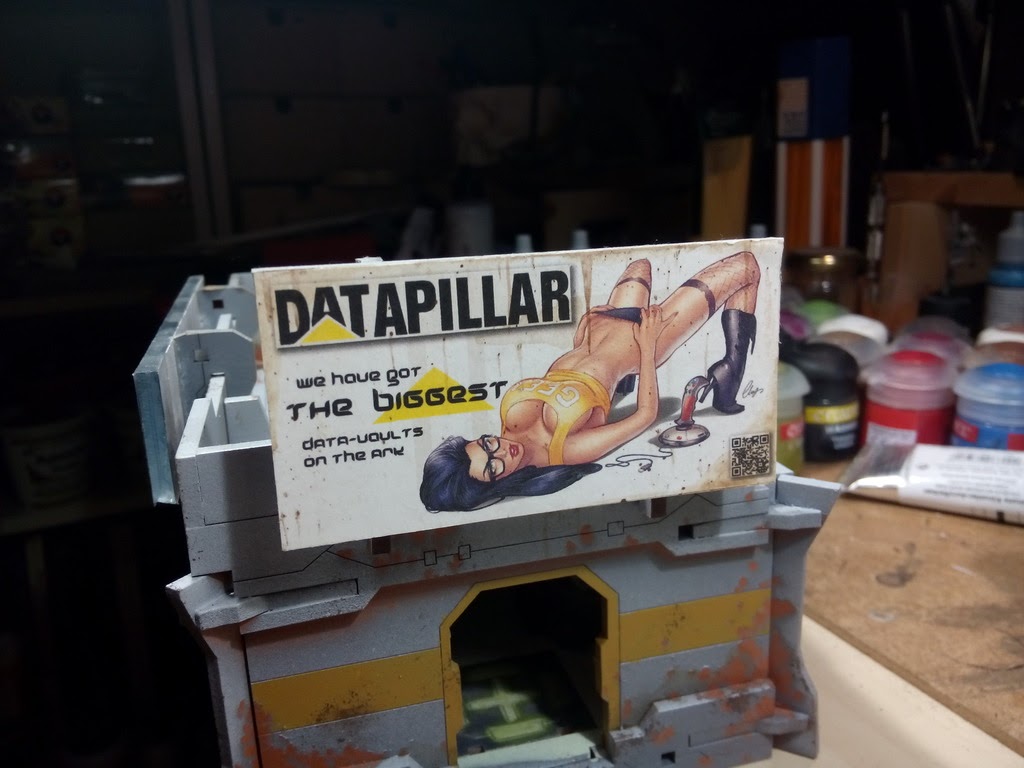
6. Other uses
Once you have "mastered" this technique, the possiblillities will open up. On the Datapilar Building, i.e., I have used two prints on each side of a thick Plexiglass sheet. This way another sort of Holoeffect is achieved.


Well. That's basically it. The rest is practice, a steady hand and some imagination. I dearly hope you found all this useful.
Until next time!
This comment has been removed by the author.
ReplyDeleteI am not sure, why the comment has been deleted, but it was basically "where do I get the pictures I use from?"
DeleteBasically, I am roaming the net for suitable stuff and fix it up with paint.net (free and extendable program, once you get used to it and have all the add on you want, it is really great). Another thing is... get the FONTS! There are several databases for free fonts and they really spice up you posters.
You can also simply google for suitable posters or use the large picture dumps in the international forum :D